

Best AOTR Perks for ODM: Which Should You Get First?

A rare Perk drops, another player recommends Kengo, and you start wondering whether your whole setup needs replacing. For an ODM blade player in Attack on Titan Revolution, the useful first question is what interrupts your runs. Not finishing a clean nape attack, being injured before the next approach and repeatedly running out of gas point towards different upgrades.
Choose Perks for the problem interrupting your runs
This guide covers ODM blade combat, with one reference choice for each usual Perk category. It is a starting configuration, not a claim that every account has the same unlocked slots. Extra family slots and specialised raid builds can change the arrangement, but you do not need to rebuild around those systems to make the next useful choice.
The community Perks reference distinguishes Core, Offense, Defense and Support effects. Its numerical ranges describe Level 0 through Level 10. When a Perk in an aotr shop is listed at Level 0, compare it with your current copy at its actual level, rather than with the guide’s Level 10 maximum.
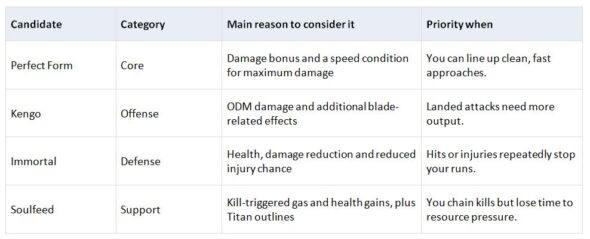
These choices solve different problems. A defensive Perk cannot substitute for a missing damage effect simply because both are Mythical. Likewise, a kill-triggered resource effect is more relevant when you are actually securing kills. Use the category and trigger condition alongside rarity when choosing the next target.
Get damage when you are already landing the attacks
Kengo is the straightforward target when your routes and survival are reliable but clean blade hits are insufficient. Its documented ODM damage bonus runs from 25% at Level 0 to 40% at Level 10. It also carries blade-related benefits, so compare the complete description rather than treating that damage line as its only feature.
Perfect Form is the Core choice in this reference setup. Its maximum-damage condition depends on maintaining a proportion of your maximum speed. It suits a player who can approach the target deliberately. If your attacks frequently miss, practise the angle and movement first; increasing the damage available on a successful hit does not make a missed swing connect.
Unparalleled Strength is a useful Offense alternative to keep in mind. Its documented damage bonus rises from 15% to 25% with enhancement. You can continue using a developed copy while working towards Kengo, instead of leaving a useful slot weak simply because you have not completed a preferred Mythical setup.
Get survival when injuries end the run
Immortal is worth considering first when you are regularly hit before completing your route. Its defensive effects combine a larger health allowance with damage reduction and a lower injury chance. That combination may address an interrupted run more directly than another damage purchase.
Keep expectations specific. Reduced injury chance is not immunity, and extra health does not remove the need to avoid grabs or improve your approach. Judge the upgrade by whether you can remain active through the part of the mission that previously stopped you. If you already survive comfortably, another category may deserve attention sooner.
Get sustain when you can keep the kills coming
Soulfeed becomes attractive when you can clear ordinary Titans consistently but resource pressure breaks the flow. Its gas and health gains are triggered by kills. That condition matters during a prolonged boss phase with few kill opportunities: the same Perk may contribute less there than it does while clearing groups.
Gear Expert is a practical Support alternative when control and movement are the more immediate concern. Its control and speed bonuses serve a different purpose from Soulfeed’s kill-based recovery. Keep it if it helps you line up dependable attacks, rather than replacing it solely because another Support Perk has a rarer label.
A working upgrade can wait for the right replacement
Consider a hypothetical player, Maya, who uses Perfect Form, Level 10 Unparalleled Strength, Gear Expert and a basic defensive Perk. Her attacks connect, but two injuries often force her out of the run. She can obtain either Level 0 Kengo or Immortal and has resources for only one acquisition.
Choosing to Buy AOTR Items for Maya’s Offense slot means comparing enhancement costs as well as the Perk name. Her Level 10 Unparalleled Strength already supplies a 25% damage bonus, matching Level 0 Kengo’s damage line. Kengo’s other effects and potential 40% bonus still matter, but reaching that level takes Gold and other Perks. If those resources are limited, the initial acquisition does not immediately provide a fully developed replacement. Immortal addresses Maya’s repeated injuries more directly while her existing Offense Perk continues doing its job.
Change the situation and the priority changes. If Maya survives reliably but clean hits consistently fall short, Kengo and its further enhancement become more interesting. If she clears targets comfortably but repeatedly loses gas between them, compare Soulfeed with Gear Expert. The names stay the same; the reason for obtaining one changes.
Keep enhancement resources for the Perk you intend to use
Develop a Perk whose trigger you can use consistently. A speed-dependent benefit calls for reliable approaches, while kill-triggered recovery needs a steady supply of targets. Keep a useful alternative equipped while building the replacement, then compare their displayed effects at the levels you can actually use on your next solo mission or coordinated raid.
3rd-strike’s Attack on Titan 2 review highlighted the freedom of moving across the map with ODM gear. AOTR is a separate Roblox experience, but movement is central to this build too. Test one change on a familiar mission, watching missed approaches, injuries and refill interruptions. Obtain the Perk that addresses the recurring interruption before expanding the wishlist.





No Comments